Getting a digital data plan is quick and easy, but many travelers wonder what happens after the purchase. If you have never done it before, learning how to install an esim might seem a bit technical. However, the entire setup process takes less than five minutes.
Whether you use an Apple iPhone or a Samsung Android device, this complete step-by-step guide will walk you through scanning your QR code, configuring your network settings, and getting online abroad without hassle.
Before you attempt to install an esim, make sure your device meets these critical requirements to avoid unexpected connection errors:
Carrier Unlocked: Your phone must not be locked to a specific local carrier (like AT&T or Vodafone on a fixed contract).
Device Compatibility: Ensure your smartphone model natively supports embedded SIM technology.
Stable Internet Connection: You need an active Wi-Fi connection (at home or at the airport) to download the digital profile initially.
2. How to Install an eSIM on iPhone (iOS)
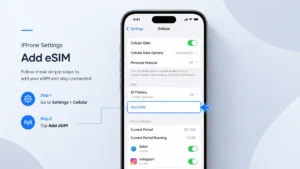
Follow these simple steps if you are setting up your digital data plan on an Apple iPhone:
Open Settings: Go to your iPhone Settings and tap on Cellular or Mobile Data.
Add eSIM: Tap on Add eSIM or Add Cellular Plan.
Scan QR Code: Select Use QR Code and scan the code provided via email by your carrier. Alternatively, you can enter the manual installation details.
Label Your Plan: Name the new line something recognizable (e.g., “Travel Data” or “Airalo Europe”) so you don’t confuse it with your primary line.
Enable Data Roaming: Once you arrive at your destination, turn on Data Roaming specifically for this new travel line while keeping your primary line data off to avoid fees.
3. How to Install an eSIM on Android (Samsung & Google Pixel)
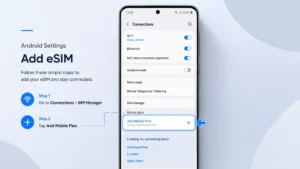
The installation process on modern Android devices is equally straightforward:
Open Settings: Go to Settings > Connections (or Network & Internet) > SIM Manager.
Add Mobile Plan: Tap on Add eSIM or Add Mobile Plan.
Scan QR Code: Choose the option to scan the QR code provided by your digital data provider.
Confirm Installation: Tap confirm to download and install the profile onto your device’s secure element.
Turn on Data Roaming: Enable data roaming when you land abroad to start using your high-speed internet package.
Frequently Asked Questions (FAQ)
When should I install my travel eSIM?
You can install the profile days before your trip while connected to home Wi-Fi. However, the validity period typically only starts ticking the moment the chip connects to a supported local network abroad.
Can I delete the eSIM after my trip?
Yes. Once your data package expires or your trip ends, you can safely remove the profile from your phone’s cellular settings without affecting your primary physical SIM.
Mohamed Kacha is a digital entrepreneur and tech writer specializing in international mobile connectivity and travel tech. With hands-on experience navigating roaming challenges and testing global eSIM solutions, Mohamed is dedicated to helping travelers stay connected seamlessly without breaking the bank